


.JPG)


.JPG)


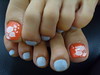
Several of you had concerns on how to make the full nail plate designs work for longer nails. I will be showing you two options that I know of.
1. HOW TO MAKE A FULL PLATE STAMP WORK ON LONG NAILS:
OPTION 1 - THE FRENCH TIP
Stamp/Paint a french tip on the end of the nail starting where the full plate design ends. I have seen The Nailphile do this many times, and if you have seen her nails, you know they are LONG! Several of her finished konads done in this style can be found HERE, HERE, HERE, & HERE, just to show you a few.

 Any un-stamped on the french tip can be filled in using the nail polish brush.
OPTION 2 - THE DOUBLE STAMP
Another way, is to do a double stamp on the nail. The double stamp method works great for stamps that don't have definite lines. Trying to get lines to line up would be impossible. The trick for doing the double stamp is to try and get the designs stamped as close as possible without over stamping on the first stamp too much. A little won't be so noticeable, so just try and stamp as close as possible.
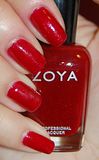
 One stamp.
 Double stamped.
If I didn't tell you that was double stamped, I really don't think most of you would have known. Again, I reference The Nailphile, she has a ton of double stamped images on her blog. You can see a few of them by clicking HERE, HERE, HERE, HERE & HERE.
Again, the best way to tell if a double stamp will work is to TRY IT!!
2. HOW TO LINE UP THE FRENCH TIP PLATES ON YOUR NAIL
When I was practicing this the other day, I never realized just how hard it is to line up the french tip plates! No matter how many times I tried, the tip would be off center. Thanks to Colette of My Simple Pleasure's who remembered a post that was done by Steph at Nail Juice. She has the most clever way of lining her french tip's up. You can find Steph's post HERE, where she has pictures of this procedure.
Basically what you do is after you get your stamp ready (you have your paint on it and it is ready to go) you turn your hand over so that your palm is facing up, and you place your nail in the right spot on top of the stamp. Basically instead of stamping your nail, you are placing your nail on the stamp. I tried this out on my mom, and it worked great!! Steph you are a genius!! Here are the results of my mom's french tip designs:


You can really tell with this stamp, since it has a definite center point to it, that Steph's trick really works!
3. SET ASIDE SOME TIME
One of the most important steps to trying out Konad, especially for beginners, is to set aside some time. You need time to basically "play" with your konad set. This gives you time to find out what brand of polish works best with konad, or what polish works best for the plate design you choose, what colors work good together, etc. All of these things are necessary for getting good results with your konad, and soon it won't take you but a few extra minutes to whip out a great Koni!
Well that's all I have for you! Please, if there is anything I didn't cover, feel free to ask me in the comments section or send me an email to getchanailsdid.blogspot.com.


10 comments:
Oh my! That Konad is pretty nifty. I gotta get my hands on one. lol
I saw that they have a Hello Kitty one. =D
RAI - Where did you see it at?
Great advice Brooke! I don't know how I can match those images up before they dry on me! Maybe I'll give it a shot. I'm going to try to do a gradient next with help from this post. I just can't think of any colors I can use.
Brooke, I saw it on someone's blog. Can't remember who, but it had a Hello Kitty stamp on it.
Thanks Brooke for putting together the konad tutorial togther. I'm sure it took a lot of time and energy to put together. You've done a great job explaining and showing how it can be done! I'm now seriously thinking of trying it out. Now that I don't have the fear of the unknown anymore,lol!!
NESSA - Well good luck with your gradient. I think I saw where Steph at Nail Juice had done one too. You might check her blog about that too.
RAI - I bet it was Polish Pixie. I saw it on there, but it is the same stamp as the one I already have.
VELVET - No problem! I hope you get one, they really are fun and can change the look of your nails from Drab to Fab - lol!
Thank you so much for putting this all together for us! I'll be Konading later this week and am sure I'll be referring back to your post.
Thanks Brooke, you are a doll for doing this whole Konad tutorial. I really appreciate all the time and effort it took you to put this together. I think I'll have to print all the instructions out. I have to wait until I get another printer. Mine only prints part -way and then that is it.
Thank you, great tutorials, i found some useful tips, even though i consider myself an advanced user :)
Very useful tips! Thanks again for taking the time to do these tutorials; very helpful!!
Post a Comment