


.JPG)


.JPG)


I tried to take as many pics as I could, so you could visualize what I will be trying to explain. I tried to make this as in depth and simple at the same time, not an easy task, lol! So if anyone is confused on anything or has questions, please feel free to ask. So let's get started!
The first thing I can't stress enough about Konad is: KONAD IS A TRIAL AND ERROR PRODUCT!! I say that because, as most of you noticed, it doesn't always work to just paint, scrape and stamp. The first time I tried my Konad I made the mistake of doing just that, expecting it to come out perfect. What I did was end up ruining a perfectly good mani! lol My hopes with this tutorial is to help you all avoid that and get back into being excited about using your konad.
MY SETUP:
This is what I get set up at home before I even attempt to start using my konad. It is best to have everything you need right there within arms length.

PAPER PLACE MAT - Basically just a piece of paper I do all my stamping on. Konading can get a messy, and the paper really helps with clean up and any "ooops" you might do, which I have a tendency to do :)
SCRATCH PAD/PAPER - I use this to "test stamp" on. You can use anything, a notebook, piece of scratch paper - what ever you have handy will work. It does need to be somewhat blank though, so you will be able to see your stamped image.
ACETONE - 
I prefer to use Acetone, but please feel free to use whatever remover you have handy!
COTTON BALLS / Q-TIPS -

I keep my cotton balls in a plastic cd lid (from the big stack of blank cd/dvd's I buy). I like this because I can keep an acetone soaked cotton ball in there and not worry about it ruining anything. I have also just left my acetone soaked cotton ball on my paper place mat - another good reason to have one laid out :)
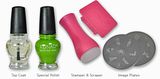
TOOLS OF THE TRADE - I get all of my image plates laid out that I think I want to use. I also get my stamper and scraper laid out on the paper too.
NAIL POLISH - I will get all the polish I plan on using out and handy. This goes for the Konad SP and any regular polish I am going to try.
Ok, now you are ready to begin :)
TIP # 1:
TEST! TEST! TEST! Test out all designs and polishes before EVER stamping them on you nail!! That is a sure way to mess up your perfectly polished nails! I can't stress this step enough to you ladies. Doing a test stamp lets you know several things. It lets you know if you applied too much/too little pressure while scraping the image plate. This is a great way to test out other polish brands to see if they will work or not. This has to be the most time saving and temper saving thing I have ever done. Use that extra piece of paper or scratch pad and test, test, test!
TIP # 2:
Use a PLASTIC scraper! I think most of the kits come with a metal scraper, do not use this. Metal will just scratch up your plates. The plastic scrapers are usually available wherever you order you Konad kit from. Both AMABILE & BODY AND SOUL tell me that an old, plastic credit card can be just as good as the plastic konad scraper.
 My plastic Konad Scraper.
PAINTING THE IMAGE PLATE - I would suggest starting out with using the Konad SP to start out with and choose one of the more simple designs until you get the hang of using your konad kit. You want to paint over the image completely. This doesn't have to be a thick layer of polish, just enough to cover the entire design. You don't want to make it to thin, or that can cause the paint to dry to quickly. The Konad SP are of a thicker consistency, and therefore are better about not drying out so quickly. Whereas, I have noticed when I try to use regular polishes, some of them have a tendency to dry quicker.
 Unscraped Image plated painted w/ black Konad SP
SCRAPING THE IMAGE PLATE - This is one of the most important steps in getting a good image to stamp on you nails.
 Freshly scraped image plate.
Scraping Too Hard: This will cause you to take too much paint off your image, and when you try to stamp, this is where you get those unfinished stamped images. Also, if you are using a nail polish that has a tendency to dry quickly, scraping to hard will not leave enough paint in the image plate, thus making it dry out to fast.
Scraping Too Light: If you scrape too light, you will notice that you just kind of smeared the paint, instead of scrape it off. A little smearing is ok, the best way to see if the smearing will show up is, again, to do your test stamp! A lighter scrape is good for the more detailed images.
USING THE STAMPER - Now that you have your image scraped, the next step is to get the image on the stamper. You need to work with some haste will doing this so as to not let your polish dry up on you. I take my stamper and push directly down on top of my freshly scraped image, then pull straight back up.
TIP # 3:
STAMPER WON'T PICK UP THE IMAGE - There could be several reason's why this is happening.
1)Did you scrape too hard and the paint dried on the plate before you could transfer it to the plate? If so, using acetone, wipe the plate clean, and start over, this time using a much softer scrape, and working a little quicker.
2)Is your stamper to slick? I have heard that using a nail file or buffing block on your stamper will help it with picking up the image. Don't go to town on filing or buffing your stamper, just a light file or buff should get the job done. Clean your image plate and start over.
Buffing block used to "rough up" the stamper.
3)Did you push down hard enough with your stamper onto the image? If you are unsure, clean your image plate and start again, this time applying more pressure.
4) Did you touch your stamper with your fingers? You can deposit the oils from your skin if you touch your stamper (and the image plate too) which can make the stamper not pick up the image properly. Just simply wipe down both your stamper and image plate with acetone and start over.
STAMPING THE IMAGE - Before you stamp that on your nail - did you do your test stamp first? 
Pictured above is an example of Test Stamps. If you look closely you can see the first stamp isn't quite as bold as the one towards the bottom. To get the bolder stamp, I didn't scrape as hard, which left more polish for the stamper to pick up and distribute a nice, bold, even stamp.
The best way to stamp is to use a "rolling" motion. Since I couldn't stamp my own nail and take a picture at the same time, I am using the lid of the Konad SP bottle to demonstrate :) When you are doing this, you need to apply a good amount of even pressure so that all of the image is transfered to the whole nail.
 Start on one side of your nail
 and start to "roll" the stamper across the nail
 Keep rolling until you reach the other side.
TIP # 4:
Your polish appears "stringy". This happens if you let your polish dry on the stamper. You either scraped the image to hard, and left only a minimal amount of polish to be picked up. OR You worked to slow after stamping the image to stamping the image on your nail. OR The polish you are using is just too thin to give you a proper stamp. I have had this problem when using the Nfu Oh Holo nail polishes, those are very fast drying and it is a thin polish too. This tends to work better on a less intricate design.
TIP # 5:
Keeping your stamper and image plate clean in between stamps is a good way to ensure that you pick up a nice, clean, complete image onto your stamper. AMABILE suggests using pure acetone to clean your image plate, scraper and stamper. And BODY AND SOUL suggests that keeping them clean between each use will aid in getting a good image.
MY STAMPED IMAGE DOESN'T LOOK RIGHT - If you have done your test stamp, and done all the trouble shooting above and just happen to mess up stamping the image on your nail, I have a solution short of taking your nail polish off and starting from the ground up. You must be careful when attempting this, and must use a minimal amount of pressure. You also must make sure that when you did your mani underneath that you put a nice, good top coat on it. I have taken a acetone soaked cotton ball and LIGHTLY and quickly swiped it across my nail to remove a badly stamped image. Please note, you must use a very light pressure when doing this, or you will mess up your mani underneath. This isn't meant to do over and over on the same nail either, or the acetone will just remove your base mani.
 Here is a picture showing an image that I didn't stamp correctly. I didn't continue all the way to end of my nail with the rolling stamp method.
 Here is what the nail looks like after doing my acetone removal method. You can still see a little bit of black, but don't worry about that.
 This is the same nail that I messed up on above that I cleaned off using acetone and re stamped the image on.
If that didn't help, I don't know of any other way to fix the image, short of starting over from scratch. This is where the test stamps have saved me much time and energy.
TIP # 6:
Test stamp on plain, unpolished nails or on an old mani that you plan on taking off. Both of those are great ways to test your stamps and polishes to see what combo works the best!
TIP # 7:
KAJSA uses tweezers to pick up here acetone soaked cotton balls to clean off her stamper and plates. This helps you to avoid messing up your nails while handling the acetone cotton ball.

I personally tried this last night, and it was a little difficult for me to do. I think if my tweezers had a bigger opening, it would have worked better. I usually pick up the cotton ball with out letting my finger nails touch it. I have pics on how I hold my acetone soaked cotton balls below. Please try both methods, or your own method, do what works for you!


MY KONAD STAMPED IMAGES ARE JUST LIKE I WANT THEM - Once you have your images stamped on your nails, it is time to protect them with a top coat. By the time you have gotten done stamping all of your images on your nails, they should be dry. I mean we have been working at a furious pace as to not let the polish dry on the stampers, right? Right! Believe me the smudging that occurs is NOT from the polish not being dry. This was a big misconception I had when I started doing this. I even bad mouthed Konad SP, since those seem to be the worst smudgers. The smudging you get is from over polishing or over working your top coat. Get a nice amount of top coat on your brush and try to cover your nail in as few brush strokes as possible. DO NOT re-brush over a part of your nail that you have already applied top coat too, this is where you will smudge up all your hard work. Do not worry if your top coat doesn't look great, you can always come back after it has dried and put a nice finishing top coat on over it and make it look wonderful.
TIP # 8:
Your stamped images don't have to be "perfect"! I promise you ladies, if your image is a little off here, or smudged a little there, most people won't notice those imperfections! So don't kill yourself trying to get that picture perfect stamped image, because it most likely isn't going to happen.
TIP # 9:
What is the best kind of polish to use?
I say TRY THEM ALL! I don't believe that one brand of nail polish works, while another brand doesn't. It all depends on the polish you are trying to use. I have had China Glazes that work wonderful and China Glazes that worked terrible! The best way to tell if a polish will work is to do some TEST STAMPS (yes, the test stamps again :P) with it. I do suggest that you all have at least a bottle of Konad's Special Polish in black and white. These are the best, most opaque white and black that I have tried. Konad SP gets a bad rap because of the smudging - but I just told you all how to avoid that!
TIP # 10:
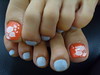
Dress up those Konad mistakes! You can always use any of your nail art supplies to put a fix on a simple Konad mistake, plus it adds a little pizazz to your nails too! You all might remember the Cherry konad stamp I did on my nails the other week. Since I wasn't just real pleased with it, I used Nail Art pens and colored in my cherries, and used a glitter nail art brush and went over the stems. Your imagination is your best tool :)
Below I have a few more pictures that I took, that I will just be adding a few quick explanations underneath. I think if you read all the information above, these quick explanations should be easy to understand. Again, feel free to ask me any questions and I will try to answer them for you all!
 I wanted to test a "dark" color to see how dark it would actually be on my nail.
 As you can see from the test stamp pictured above, it isn't a really dark stamp. Don't be fooled into thinking that just because a polish looks dark in the bottle that it will stamp dark on your nail.
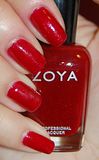
 Here is an example of a clear looking red. Most would think that this wouldn't give a very dark stamp.
 However, after doing a test stamp with this color, you can see that it really is quite a dark color. This is where looks can be decieving, and why test stamping is so helpful.
 See how nice and dark that is on my nail?
 This is a test stamp using my holo Nfu Oh. As you can see, because this type of polish tends to be so thin and dries so quickly, it doesn't take well to a stamp this intricate. However, the Konad SP is a perfect canidate for a stamp like this. Let's see how it did on my nail:
 Not too bad, eh? Again, this is all trial and error, not one brand of polish is going to work everytime with every stamp.
 This is a design that I wanted to add a solid black french tip too. So I started out by picking a bold dot stamp. I was actually trying to get this to stamp on my nail straight up and down, however I did it at an angle. I liked the angle look much better and kept it. Some mistakes are good ones, you just gotta roll with 'em.
 This is my french tip plate. I plan to go more indepth with this in part 2, since I will be doing this on longer nails. My pinky nail is the longest one that I have, so I figured I would give it a go and see how it worked.
 As you can see, I didn't get a good "rolling stamp" on this, however, since this is such a broad design, I simply pulled out a black polish and filled in the french tip.
 Ta-da! This is the perfect example of a konad stamping gone wrong, however, I improvised and it came out pretty good.

 The little bit of smudging you see here is not noticable unless you are looking at an enlarge pic like this. These aren't perfect, but from a couple feet away they sure do look like it :)
 This ones needed a little more clean up, but you get the idea.

 Again, a little bit more clean up is needed on this. Working on cleaning up a dry nail is so much easier and you create alot less mistakes too.


32 comments:
Thanks Brooke - that was an excellent tutorial, filled with many, many useful tips! You've convinced me - I'll pull the Konad out again this weekend, and give it another go.
I was just wondering earlier this week why no one uses nail polish with scrapbooking type stamps - seems like that would be a lot less work than this (stamp a polish-soaked sponge, then stamp the image on your nail). I'm seriously considering trying something like that too in the near future.
Thanks again - very inspirational!
JAMIE - Thank you so much! I would love to hear how your konading turns out!
About the scrapbook stamps, I did give that a try! lol Before I got my Konad, I figured it was the same thing. I bought little stamps that would fit on my nails. The problem with the scrapbook stamps is that the rubber is too hard. It wanted to slip on my nails instead of stamp the image on. The cushioned konad stamp is much better for stamping.
I have not tried the sponges you mentioned though.
Brooke, that is the best Konad information I have ever read. I don't own a kit yet. When I do get one I will refer to your instructions. They are really detailed and the pictures will be a big help also. Thank you so much!
LUCY - Thank you sooooo much! This thing took me all day to write and get organized, I had no clue yesterday what an undertaking I was taking on - lol! But I am proud of the finished (or almost finished after part 2) product and I think it could really help those who need a little help with their Konad.
Quit dragging your feet and get you a Konad girl! lol
Love your post today and thanks for all the tips! I actually have another question for you. I personally like to match my right hand to my left hand design but "mirror" it. Of course, with some of the designs you can't do this because they only face a certain way. I thought of a solution. Stamp the image with one stamper and then transfer that onto another stamper and then stamp that onto the nails. I only have one stamper though so I thought maybe you could try this idea and let me know if it's worth buying a second stamper. I'm thinking the image might be alittle faded but maybe that's ok. Would you mind trying this for me?
CRYSTAL - I would love to try that out for you, but I too only have one stamper! I have noticed that several of the fauxnad plates I ordered off ebay have the mirror image stamps on the same plates.
Hi, thank you so much for this tutorial. I only used my konad 3 times in 2 months. This got me back in the game for sure. I have a question for you though. I really want to do a halfmoon mani and I tried the strips but they don't work for me at all. It just makes my nailpolish come off or leave some glue residue on my nails. Is it possible to make the halfmoon with the m19 plate?
love your blog
Brooke, no worries. Maybe someone with two stamps will read my comment and try it!
if someone does get it to work, send me an email at crystal_dauria@hotmail.com! I'm looking forward to Part 2 because I'm thinking about getting some of the french plates soon. I love Konad!
MAJA AND SUSSI - I'm so glad to hear your going to give your konad another go! I will def. try out the half moon mani and let you know the results! Thanks for the request!
CRYSTAL - I am so sorry! I need to look into getting the smaller stamper they have out there, then I would have two of them. Let me know if anyone trys that out for you, I'm sure there are others that would like to know the results too. Thanks for the requests, I am just sorry I don't have the means to test it out.
OK, I'm going to try again. You have addressed what I think may be my Konad issues: the metal scraper and my stamper being too smooth. I was getting ZERO results w/those. So, I will try w/this fabulous Misa polish I'm still wearing and see how it goes. If it goes well, I'll post some pics!
Thanks Brooke! :)
Brooke~this is great! You covered alot of things I've wondered about and given me ideas for things I never thought about! I don't actually use a cottonball with tweezers, sorry if I confused us! I use one of those flat cotton pads...I think they're made for eye makeup removal? I soak it, lay it on something it can't soak through, then swipe my stamper across it after I stamp each nail to keep it clean for the next one. That was, I don't have to touch anything and ruin them. hth! Looking forward to this continuing saga :)
EXCELLENT Tutorial Brooke. Spread the Koni love ♥
On getting the french tips on straight - Nail Juice has a great little tutorial here that worked wonders for my technique:
http://nailjuice.blogspot.com/2009/02/how-i-konad.html
Wow, great job explaining and showing how the konad works. I don't have one yet. But when I do get one,I'll be sure to come back and use your instructions. Thanks for posting. I'm sure that was a lot of hard work!!
Awesome tutorial!I hope this will open a world of fun Konad possibilties to any ladies who were having a difficult time!
Great Tutorial! I've been trying to decide if I want one of these and you've just made the decision for me :D Konad here I come!
Great tutorial! I had a feeling Konad was not for me, as pretty as the results, now i know for sure.
I'm impatient PLUS i'm all thumbs, not a good combo for Konading your nails.
Brooke, sorry I'm a little late on this, but THIS IS AN AWESOME POST! I'm gonna have this post close by when I do my next Koni (hopefully tonight!). I think I will have some better success this time now that I had your tips. I think I was scraping too hard and other things! Don't think I have any more questions. Can't wait for the next installment, since my nails are getting a bit long ;)
I'm a little late here as well; but THANK YOU for this awesome, highly educational post!!! I just attempted my first Konad...should have read this first...will use the guide next time :)
*cheers*
Hey Missy - I just got my Konad in the mail today!!! Now I'm going to read this and give it a try! If I fail miserably, can I come down and have you teach me??? j/k I'm in Wichita - If you ever get up this way and need a place to stay - you're welcome any time!
Kathryn
MRSKIWIYETI - Congrats on getting a konad! I don't know what I would do without my Konad now!
I actually have family in Wichita! Last name of Butcher, happen to know any of them? Wichita is where my mom was born and raised, she is actually heading up there this weekend!
Tis a small world! Nope, I don't know any Butchers... But if you ever get up this way, please be sure to hollah!!!
Thankyou sooo much for this - some great tips there.
I've only tried using my kit a couple of times and hadn't given up, just not had time to practise fully.
I'm inspired to do so now though so thankyou. It'll definitely be worth it. I love your leopard print KOTDs!
Thank you so much for this!!! I just tried Konad stamping for the first time, i was awful lol so going to read through this in full before i try again- it looks really helpful!
great tutorial! easy to read, awesome tips, and clear pictures to illustrate. ACE!
Great tutorial, thanks for the tip about the credit card. You are so right plastic scrapers do work better.
I do have a bit of advice I ran across while trying out on my own. When it comes to polish removers to clean the plate and stamper.
If a person uses a polish remover with moisturizers in it. Or other junk... it can prevent the image from being picked up. So please spread the word that you only want to use an acetone or non acetone that is bare. Nothing added... the added stuff will prevent the stamper from grabbing the polish. I was going insane when my stamper wouldn't pick up right until I switched removers and it was like night and day. A LOT of removers are sold with other additives in it.
Hi
Thank you very much for sharing. I just about almost lost my temper with my Konad kit. The stamp wasn't picking up the design and after battling for 2 hours I almost broke the thing. I came accross your post and you mention buffing the stamp. IT WORKED!! Thanks again. Your' awesome!
Hi!! thi is an awesome tutorial!! I actually just got my kit to do this nail art. I though that my bad results in my firts tries were because it isn't konad brand, but just another chinesse imitation. I was quite sad thinking I wouldn't be able to do this amazing things in my nails. But I see you mention situations similar to what happen to me with your konad... so I'll keep trying. I guess nail varnish is really important. I'll get some konad varnish.
Thanks a lot for it!!
LOVELY!!! I ENJOYED A LOT! JUST A LITTLE PIECE OF ADVICE...HAVE YOU EVER TRIED TO USE COTTOM DISKS? THEY WOK BETTER FOR CLEANING THE IMAGE PLATES AND THE MESSY NAILS! GOOD LUCK! (SPAIN)
Well I had tossed what I lovingly called "that thing" in my drawer of polish I hate, now I am going to get it out and try again! Excellent tips, particularly like the pad of paper to practice!! I'll let you know how it goes.
Wonderful tutorial, I am guessing it really did take you a day or more to write it.
Thank you! Angelique
Great post! I had no idea what Konad was or how it works till I read this.
http://thestylester.com
Well, I'm obviously late to the party. I just ordered a Konad kit today. It comes with the plate with the paisley design you showed.
This is a great tutorial and I will be following it to the T when I get my order in!
Post a Comment