Tuesday, March 31, 2009

NEW BLOG ON THE BLOCK

I am late with this one, ladies! I just happened to stumble on it from a comment that Velvet left on another blog about a post on her blog (is your tongue tied yet?) LOL


The name of the blog is BRING ON THE BLING (great name!)
Here is what Velvet says on her first post:

Let me start by thanking all the lovely ladies out there who already have nail polish and beauty blogs!! You ladies are what inspired the "lady who was too shy to leave you a comment". To start one of her own! You know, one of your anonymous readers. That drives you nuts by stopping by to read but never saying, " hello". Lol! Well, that's all going to change. You ladies have helped me find my voice.


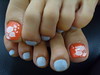
Velvet (you might have seen her in the comments section here) just started her blog on March 21st and she already has 20 posts up! She has polish collection swatches (including my main want right now, the Color Club Electro Candy collection), individual nail polish swatches, and GLITTAH pics coming out the wazoo! lol Not to mention the fact she wasn't to scared to share a pic of her foot either :)


What's not to love about this blog!! Get over there and check her out! And don't forget to leave her a comment and let her know what you think, us bloggers just LOVE that :)


======================================
DO YOU HAVE A NAIL BLOG???
I try to catch as many nail polishes blogs as I can, usually from comments, other blogs favorite lists, and by checking my followers profiles, but on occasion I do miss a few. If you have a nail blog and would like for me to feature it here, please let me know in the comments section or by sending me an email at getchanailsdid@yahoo.com

I'M FEELING ARTSY!

This is what happens when I have plainly painted nails, a Sally Hansen Nail Art Pen and time on my hands. . . . . . .


How addictive are these pens??!! Very addictive I say. I did that sitting here at my desk at work today. And let me tell you, if you don't put a top coat on over this, it will come right off. I have almost rubbed all those doddle's off!
I think I feel the need to do some nail art tonight ladies!!

BARIELLE WEDNESDAYS


I was recently contacted by a rep for Barielle, and was asked if there was a product I would like to try of theirs. Of course I am ALWAYS up to try new nail products, so I checked out their website. I have heard of Barielle before, but I have not tried any of their products. Here is a little background on Barielle I found on their website:

Over 30 years ago, Barielle introduced "Nail Strengthener Cream" as the first nail care product of its kind. Originally formulated to condition the hooves of million-dollar thoroughbred racehorses, this legendary skin care product helps nails grow healthier and stronger while resisting splits, peels and breaks. Its effectiveness launched Barielle as a nail and skin care company with unique products and approaches to treating, protecting and maintaining nails. Barielle has since evolved into one of the leading prestige nail care, hand care and foot care brands sold in the world, known for our cracked feet treatments and the best moisturizers for dry skin.


That explains the little horses on the boxes! I responded back that I would love to try the Growth Activator for Natural Nails. I thought this would be the perfect product to help my nails since they are STILL recovering from the acrylics I had on. I also explained in the email that was the reason I picked that product, and that if she knew of another product that they had that would help with my problem to send that instead.


Not only did Barielle send me:
Growth Activator for Natural Nails (for weak, hard to grow nails)

They also included:
Intensive Nail Renewal Oil (for dry hard cuticles)

Nail Strengthener Cream (for healthier, stronger nails)

Extra Gentle Cuticle Minimizer (for hard, ragged, or dry cuticles)

How generous was that? I am so excited to try out these products! I am really hoping that it kick starts my nails into growing and taking on a healthier appearance.


So starting tonight, I am going to start using all of these products on a daily basis (or as often as directed on the treatment). I am going to take pictures of my bare nails every Tuesday night and post them up on Wednesdays in a reoccurring post entitled "BARIELLE WEDNESDAYS". I figure this will be one of the best ways to not only track the progress of these products, but to keep me on track and using them.


Would love to hear from you all on this brand or these products! Have any of you tried these specific products and if so, what did you think of them.

YOU NAMED THAT FRANKEN

errrrr, well WE named that franken, lol! After the weekend long vote, Spark In the Dark was the winning name! So thank you to all who voted!! I have another little Originals By Brooke to add to my stash!


  • I would also like to know if any of you have tried frankening before?
  • If so, how did your results come out?
  • Are there any colors that you would like for me to try and franken?

IT'S A BOY!!!

My little sister Brandi just found out that she is having a BOY!
(And I was SOOOOOO looking forward to konading teeny tiny newborn nails!!!!)


CONGRATS SISTER!! Can't wait to squeeze that little baby!

WEEKEND KONADS

This weekend I had to opportunity to do some konading on my mom and sister. I thought you all might be interested in seeing the results of our couple of hours of nail painting we did :)

First up we have my little sister Brandi's nails:


I forgot the name of the China Glaze I used for the base color. It is a dark pink/magenta color. And then we used the hounds tooth pattern and stamped her nails in gold using China Glaze - Passion.


This was the original koni we did, but Brandi wasn't too fond of the light lavender base color, so this one was removed. I used China Glaze - Agent Lavender for the base color and then stamped the swirl pattern using China Glaze - LOL.

Next up is my mom's toes. We added a simple design to her already painted toes. The base color on the toes is Sally Hansen Salon - Pick a Pink. The color I used to stamp was China Glaze - Passion.


Then for my mom's hands I got to pick the colors and the stamps!!! I thought purple and gold would be perfect, lol!! I think my mom was starting to get a little worried at this point, of course I assured her that she could come back in a few days if she didn't like it and we would do something she liked on her nails.

Despite my best efforts (lol - just kidding) this really turned out nice!! The base color is China Glaze - LOL and the stamped butterflies design is done in China Glaze - Passion.

After all that - I didn't even feel like doing my own nails - lol!

KONAD TUTORIAL - PART 2

Part 2 will be focused on using the Konad on longer nails. As I mentioned before, I using my mom's hands and nails in the pics to follow.


Several of you had concerns on how to make the full nail plate designs work for longer nails. I will be showing you two options that I know of.


1. HOW TO MAKE A FULL PLATE STAMP WORK ON LONG NAILS:

OPTION 1 - THE FRENCH TIP
Stamp/Paint a french tip on the end of the nail starting where the full plate design ends. I have seen The Nailphile do this many times, and if you have seen her nails, you know they are LONG! Several of her finished konads done in this style can be found HERE, HERE, HERE, & HERE, just to show you a few.


Any un-stamped on the french tip can be filled in using the nail polish brush.


OPTION 2 - THE DOUBLE STAMP
Another way, is to do a double stamp on the nail. The double stamp method works great for stamps that don't have definite lines. Trying to get lines to line up would be impossible. The trick for doing the double stamp is to try and get the designs stamped as close as possible without over stamping on the first stamp too much. A little won't be so noticeable, so just try and stamp as close as possible.


One stamp.

Double stamped.

If I didn't tell you that was double stamped, I really don't think most of you would have known. Again, I reference The Nailphile, she has a ton of double stamped images on her blog. You can see a few of them by clicking HERE, HERE, HERE, HERE & HERE.


Again, the best way to tell if a double stamp will work is to TRY IT!!


2. HOW TO LINE UP THE FRENCH TIP PLATES ON YOUR NAIL
When I was practicing this the other day, I never realized just how hard it is to line up the french tip plates! No matter how many times I tried, the tip would be off center. Thanks to Colette of My Simple Pleasure's who remembered a post that was done by Steph at Nail Juice. She has the most clever way of lining her french tip's up. You can find Steph's post HERE, where she has pictures of this procedure.

Basically what you do is after you get your stamp ready (you have your paint on it and it is ready to go) you turn your hand over so that your palm is facing up, and you place your nail in the right spot on top of the stamp. Basically instead of stamping your nail, you are placing your nail on the stamp. I tried this out on my mom, and it worked great!! Steph you are a genius!! Here are the results of my mom's french tip designs:


You can really tell with this stamp, since it has a definite center point to it, that Steph's trick really works!


3. SET ASIDE SOME TIME
One of the most important steps to trying out Konad, especially for beginners, is to set aside some time. You need time to basically "play" with your konad set. This gives you time to find out what brand of polish works best with konad, or what polish works best for the plate design you choose, what colors work good together, etc. All of these things are necessary for getting good results with your konad, and soon it won't take you but a few extra minutes to whip out a great Koni!

Well that's all I have for you! Please, if there is anything I didn't cover, feel free to ask me in the comments section or send me an email to getchanailsdid.blogspot.com.

Monday, March 30, 2009

I DIDN'T FORGET

I didn't forget about the Konad Tutorial Part 2 - however, it has been a super duper busy day at work for me, and I don't think I will have it finished today. If I don't get it up today, it will be up tomorrow, so don't worry :)

Friday, March 27, 2009

NOTD - JUNGLE FEVER

These nails are throwing off a serious jungle vibe to me. The mix between the color combo's and the konad pattern I picked just look "jungley" (did I just make up a new word?) to me.


For the base color I used Icing - Akward (that's how they spelled it). I painted two coats of this color. I would have painted three if I was going to wear this color alone, but since I was topping it off, I left it at two coats. This is a nice dark green with yellowish and light greenish swirled through out.
Next, I painted a top coat of NYX - Lime Sparkle. Between the kind of yellow/light greenish tint in Akward and the yellowish/lime green glitter in Lime Sparkle, this was pretty as is. These two colors really complemented each other well.
However, I wanted to get some Konading in. I chose to use Misa - Ghetto Fabulous as my koni color once again and I picked the same zebra pattern I used on my TOTD.


I wanted to add this in as another Konad Tip - For first timers that aren't real sure about their stamping technique, or just don't want a lot of glaring mistakes, doing a stamp over a glitter base will hide any mistakes. Also, using a glitter top coat, that isn't really opaque, would be another good way to hide any little mistakes that might bother you to much.


Related Posts Plugin for WordPress, Blogger...
This policy is valid from 07 December 2009


This blog is a personal blog written and edited by me. For questions about this blog, please contact getchanailsdid@yahoo.com.


This blog does not accept any form of cash advertising, sponsorship, or paid topic insertions. However, we will and do accept and keep free products, services, travel, event tickets, and other forms of compensation from companies and organizations.

This blog abides by word of mouth marketing standards. We believe in honesty of relationship, opinion and identity. The compensation received may influence the advertising content, topics or posts made in this blog. That content, advertising space or post will be clearly identified as paid or sponsored content.

The owner(s) of this blog is compensated to provide opinion on products, services, websites and various other topics. Even though the owner(s) of this blog receives compensation for our posts or advertisements, we always give our honest opinions, findings, beliefs, or experiences on those topics or products. The views and opinions expressed on this blog are purely the bloggers' own. Any product claim, statistic, quote or other representation about a product or service should be verified with the manufacturer, provider or party in question.

This blog does not contain any content which might present a conflict of interest.


To get your own policy, go to http://www.disclosurepolicy.org