


.JPG)


.JPG)


Wednesday, October 29, 2008
BUSY BUSY BUSY
Monday, October 27, 2008
I HAD A BAD DAY


That's all that is left of my car :(
Friday, October 24, 2008
DESIGN-HER GALS
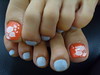
CUTE LIL' DOTS


OUTSIDE SHOTS:


Thursday, October 23, 2008
SATIN PURPLE ROYALTY


OUTSIDE PICS:


See how easy it is to look like Royalty???? :)
Wednesday, October 22, 2008
FEEDBACK
Thanks for taking the time to give me a little feedback!
HALLOWEEN DOT - 2- DOT


Tuesday, October 21, 2008
TODAY WAS A GOOD DAY
I wanted to share with you guys what all I got today. First up the Colorama Top Coats. The end two are not top coats, but they come three to a package for $1.00.

 Cala Nail Arts Halloween 3D Nail Sticker Item # 86-174 $3.99
  Cina Nail Jewelry Decals in Tiara Item # 133058 $3.49
 It's So Easy Double Sided Nail Art Brush Item # 698250 $3.99
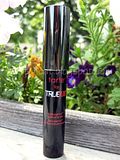
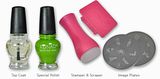
I also got another NAP (nail art pen). I wanted to show you guys the cool thing with the Nubar pens. They have a little dotting tool built right into the top of the pen, and you also get the brush tool too.
 Nubar NAP 123 Basic White $4.99
 When you untwist the whole lid you get the brush. This can be used for "drawing' or making stripes.
I hope you can see in the picture the "dotting" end. To get this you pull the top part off. There is a little metal tip and you can make little dots with this end.
IT WAS A GOOD DAY!!
DEAR ABBY TALKS NAIL POLISH
DEAR PEEVED: Before judging your mother so harshly, you might be wise to talk to more than one professional manicurist about what causes bubbles. I have seen many professional manicurists shake the bottles of polish before applying it to their clients. And I have been told that applying polish that is not fresh, or applying it too thickly can cause it to bubble.
Monday, October 20, 2008
KNOCKOFF - PART 2


{PSA} Public Service Announcement:
The cut on my middle finger is proof that you shouldn't attempt to dig chili out of a can to make chili fries at midnight after you have been tipping the beers back.
KNOCKOFF

INDOOR LIGHTING:


My sunlight pictures don't do my nails justice, but until I can get a better camera we will just have to use a little imagination. IF/WHEN I do finally get me some Nfu Oh nail polish, I will have to try this look again. It really looks pretty good in person.
**SIDE NOTE: You may notice the crack line going across my index finger. I went to open the dishwasher last night and some how bent my nail and broke it. I actually broke my real nail because there was blood and everything, but I wasn't about to attempt to fix it until I got some pictures of my nail art taken.
Friday, October 17, 2008
NOTD
 This first shot was taken inside. It just kind of looks dark in the picture, but in real life it has more color than shown here. It kind of shows a little of that dark green tint I was telling you it can take on sometimes.
 This was taken outside in the bright sun shine. Here the blue color is more dominant.
CATHERINE WONG


 These last two were my favorites of the slide show she has on her blog. And that crown ring I would kill for! Like McDonald's - I'm lovin' it!
**PLEASE NOTE THAT ALL PHOTO'S ARE PROPERTY OF CATHERINE WONG.
ARTSY FARTSY INDEED...


I tried to change the brightness contrast on the camera, so take your pick of the snaps above that you like best and just ignore the other ;).
Below I have up close pics of each nail and the details of each pic.

THUMB
The base was painted with two coats of NYC - Saffire. I then used my So Easy Stripe Rite - White n.a.p. and painted a ghost outline and painted the inside completely with white. Next I used Nubar NAP - 129 Black and made two little dots for the eyes and an oval shape for the mouth. Top coat was Poshe.

INDEX
The base was painted with Finger Paints - Shades of Dark. You can see in the pic that there was some cuticle drag with this color. I then topped it off with Black Radiance - Hot Steppa. This is such a gorgeous color!! It is clear with gold and copper colored glitter in different sizes. The colors remind me of fall leaves. Final coat was Poshe.

MIDDLE
This is a cat, I know the picture is b-a-d. It turned out so cute though! Disappointing to say the least. Anywho, the base was done in China Glaze - Cat's Eye (that's where I got the idea to do a cat face). Then I painted on a face, ears and whiskers using different n.a.p.s - So Easy Stripe Rite - Gold Glitter & Silver Shimmer and Nubar NAP - 129 Black. I did two dots of the gold glitter for the eyes and it reminded me of those old pins that had the cat face and rhinestone eyes. Top coat is Poshe.

RING
This is a leaf. Once again the picture does not do all my hard work justice :( For the base I used Black Radiance - Tease. This is such a pretty shade of gold, and it looks orange in the picture - just so wrong. I used Nubar NAP - 151 Emeraldes to outline the shape of the leaf. This is a green color with green glitter. I then went over the green with So Easy Stripe Rite - Gold Glitter, but leaving some of the green to show through. Topped off with Poshe.

PINKY
A witch's hat. The base was 3 coats of Color Club - Yell-Oh!, a very neon yellow color. Some cuticle drag with this, but not too bad. I used Nubar NAP - 129 Black to draw a hat shape, and then I filled it in. I used So Easy Stripe Rite - Silver Shimmer to make the band on the hat. Top coat of Poshe. This was super shiny. The base neon yellow color just made this look pop, and once again disappointing results with the camera.
Anyway, tell me what y'all think! Only 13 more days until Halloween.........


