Friday, January 30, 2009

MALL HAUL

I usually avoid the mall at all costs, but I went today at lunch. And I went to Claire's and Hot Topic and picked up some nail polish.


First up the Hot Topic nail colors. I have seen these on Scrangie's blog - and she makes it look so good, I figured I needed to get me some. None of the colors have any names or bottle numbers.


I got a silver foil finish, black w/ silver glitter, purple glitter, blue glitter and red glitter. These only cost $2.99 each. I am wondering how user friendly these are going to be.


Next up are the Claire's colors. They had alot more choices, but at $4.50 each I wasn't gonna go crazy. I can get china glaze at Sally's for only $3.25 each. When she checked me out though I guess it was buy one get one 50% off, so it ended up costing $3.37 ea. I think their names leave a little to be desired though. Except for the chunky glitter one, I think Slime is a great name!


SLIME is a chunky, teal/green holo glitter filled polish.

YEL is a blue polish loaded with fine holo glitter.

JEN JEN is a lime green polish loaded with fine holo glitter.

GO GREEN is a green polish with medium sized glitter.

The two shots below were taken in sunlight to try and show off the glitter, it was a little hard doing this though since I was in my car waiting in the McDonald's drive thru at the time :)

I'M IN LOVE AND HIS NAME IS KONAD

I love Konad and I don't care who knows either :)


My wonderful blogger buddy Pixie of Polish Pixie was so tired of hearing me make comments about her konad, and staring at her konad, even a little drooling over her konad, that she finally said enough is enough! She sent me my very konad so I would quit talking about hers all the time.

After my quick dazzle dry manicure I had so much extra time, I thought it was as good a time as any to pop my konad cherry! I am so pleased with the results! I did a couple of practice nails before I started my dazzle dry mani, so I had an idea of how to do it before I did the real thing. I only messed up one nail, my pinkie. Guess I got a little excited and couldn't wait a few minutes more before putting on my top coat - whoops!


Look up there! I even took a picture of my other hand so you all could see how easy konad is to use!

I forgot to look and see what plate I picked - sorry, my first time with the konad had me all shook up. But when I saw those little open dots on the top and bottom I new I needed to add a little sumpin sumpin - so I placed a gold, round sequin on each nail. So tell me, what do ya'll think about my konad skills?


NOTE TO PIXIE: rest assured, I will no longer harass your konad - I gots me my own now thanks to you :)

DAZZLE DRY RESULTS


Last night I tried out my Dazzle Dry system. It was really simple to use, and didn't really require any extra steps that you wouldn't already do when doing a manicure. None of these products were tested on animals and are 3 free products as well.

(Please note that I have added links to purchase/read more info on these products by clicking on the word STEP before each product!)


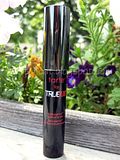
The first step calls for you to use their Nail Prep Adhesion Promoter liquid. All you do is put some on a cotton pad and wipe all your nails. This helps remove all oils from your nails so that your nail polish will adhere to the nails better.

1oz $3.00

The best part about this bottle, for me, was the opening. It has a little hole on the top, so if this accidentally gets knocked over it isn't going to spill out and waste. This also helps you use just the amount you need, which will help this product last longer since you won't use more than needed.


STEP 2:


Apply a coat of Dazzle Dry base coat. The bottle says "for natural nails", so I would assume that if you are wearing acrylics that this step isn't necessary, but I'm not for sure. Make sure that this is applied over all of the nail bed. Allow 1-2 minutes for this to dry before continuing to the next step.

.5oz $12.50


STEP 3:


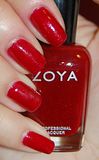
Select your fast drying nail color and paint your nails. I used two coats of High Velocity Red. This is a very nice berry red color with a little bit of shimmer. I would almost say it has a sort of pink tint to it. This nail polish applied really, really well! I was very impressed. I wasn't really expecting much of this nail polish as far as application goes, since the theme behind this is the drying time. The pictures I am posting below of the finished product is with out any clean up! That is how well this applied. Two thumbs up Dazzle Dry for your nail polish consistency and application :) I allowed this to dry maybe a minute before going on to the last step.


On Dazzle Dry's website, they have 37 different colors to choose from. I saw a color to fit everyone! There were work appropriate colors, as well as the regular pinks and reds, but there is also a baby blue, a bright neon orange, dark purples, jade green - just to name a few.


.5oz $9.00


STEP 4:


The last step is to apply the top coat. The package inserts says that your nails will be dry to the touch in 1 minute - yes 1 minute! And that in 5 minutes you can tap on your nails. It does caution waiting 5-10 minutes before digging through your purse. After painting all my nails, I went immediately back to the first nail I painted and lightly touched it. It was dry! Now of course, I didn't push really hard or anything, but it was dry to the touch. This is literally the fastest drying top coat I have ever used people :) When I first heard about Seche and Poshe and tried them out, I was absolutely amazed, well this has amazed me again. This out dried Poshe and Seche. I even waited about 5 minutes and then dug into a bag that I keep my camera in, and no mess ups occured on my nails. Now of course, the nail polish I used was a fast drying nail polish, which I am sure aided in all of this. I will have to try this out with maybe one of my regular nail polishes and see if the results are the same.


.5oz $12.50


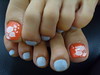
That's all there was to it. This manicure was completed and dry to the touch in about 10-12 minutes, not bad Ladies, not bad. On to the finished manicure pics:

***I didn't remove all the remaining green nail polish, so there were a few green stains along my cuticles. please ignore this:)


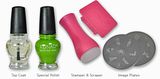
The kit shown below contains your nail prep, base coat, 3 nail polish colors of your choice & top coat. This retails for $54.00 on their website, found here.

However, there is an online coupon courtesy of Lisa Cocuzza and It's A Glam Thing, that will get you 20% off your online order by using the code listed below:

Thursday, January 29, 2009

HIGH HO! HIGH HO! IT'S BACK TO WORK I WENT

***EDIT****
I just realized that I first had this post titled as "Hi Ho, Hi Ho" - that sounded totally bad - lmao! Please note it was a lack of attention to detail and not name calling by me to my lovely readers :)
***
Well after two days off due to bad weather, I am back at work today :( However, I did have two lovely packages siting on my desk when I arrived this morning :)


The first package I opened was my KONAD STAMPING KIT!! I am so excited about this kit I could literally pee my pants - no joke!


My second package was some goodies that Lisa Cocuzza from It's A Glam Thing had sent to me! (I forgot to mention that she has a blog too, you can click this link to be directed to it.) The two items she had sent to me are from VB Cosmetics. You can check out their website by clicking here. I will have full reviews of these products very soon for you guys.
The first item is Dazzle Dry Nail Care System (click here for more details)


The second item is Be Silky Callus Spray softener w/ Tea Tree Oil (click her for more details)

Again, I can't thank Lisa Cocuzza & VB Cosmetics enough for graciously sending me these products, THANK YOU!

On an unrelated note, Dinky is none to pleased with this cold weather. She had her first taste of snow and of course I had to take her picture, well see for your self and tell me - does she LOOK like she is having fun???

Tuesday, January 27, 2009

NAILS INSPIRED BY ASAMI


I also did another nail art design for today. After checking out Asami's blog, My Manicure, she really gave some great tips on painting flowers on your nails using acrylic paint. So Asami, here is my attempt and I really am quite pleased with myself :) Thanks for your great tutorials gal!


What I Did & Used:
I painted two coats of Sinful Colors in Midnight Blue. A gorgeous dark blue.


Then I used some acrylic paint in silver I purchased at Michael's Craft Store.


And a regular paint brush I purchased from Michael's craft store. I picked one that had a short, pointy tip.


Asami tutored on her blog how to make simple flowers, so that is what I tried.
I then used a single silver bouillon ball and placed it in the center of each flower.
I think these turned out so cute. Thanks Asami, all your hard work on your tutorials is paying off girl :) Thanks again
Related Posts Plugin for WordPress, Blogger...
This policy is valid from 07 December 2009


This blog is a personal blog written and edited by me. For questions about this blog, please contact getchanailsdid@yahoo.com.


This blog does not accept any form of cash advertising, sponsorship, or paid topic insertions. However, we will and do accept and keep free products, services, travel, event tickets, and other forms of compensation from companies and organizations.

This blog abides by word of mouth marketing standards. We believe in honesty of relationship, opinion and identity. The compensation received may influence the advertising content, topics or posts made in this blog. That content, advertising space or post will be clearly identified as paid or sponsored content.

The owner(s) of this blog is compensated to provide opinion on products, services, websites and various other topics. Even though the owner(s) of this blog receives compensation for our posts or advertisements, we always give our honest opinions, findings, beliefs, or experiences on those topics or products. The views and opinions expressed on this blog are purely the bloggers' own. Any product claim, statistic, quote or other representation about a product or service should be verified with the manufacturer, provider or party in question.

This blog does not contain any content which might present a conflict of interest.


To get your own policy, go to http://www.disclosurepolicy.org